How to setup IPTV on Apple IOS/Android
Step 1:
Install and open the software on your device. You can download IPTV Smarters Pro latest APK from Playstore | iOS Store
Step 2:
Open the App and there you need to accept their terms of use for the first time.

Step 3:
As the TOU is accepted it will ask you to ADD NEW USER

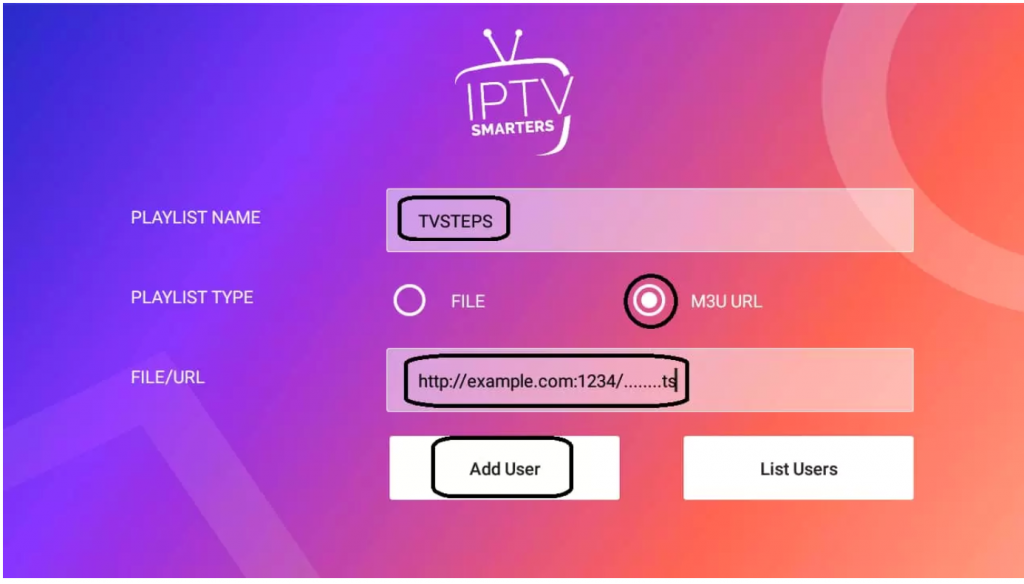
Step 4 via File/URL:
There are 2 ways of adding a profile/user of IPTV. 1 Login with Xtream Codes API and second Load your Playlist or File/URL.

For File/URL click on the first option and add the long URL of m3u or select downloaded m3u file and use any Name. Now click on Add User.
To login, via API we need to use m3u link login. here is the way of using data. An m3u link will look like this; http://example.com:8000/get .php?username=test12&password=test23&type=m3u . The login is inside this link. The usable links are marked in colors like http://url_here.com:port | username | password.

Step 5:
Now you’re logged in and a profile has been created like this:

Step 6:
Click on profile (long press if not working). You will see 3 options Login | Edit | Delete. Go for Login.

Step 8:
We’re successfully logged in and now are on the dashboard. There you can see many options like LIVE TV, MOVIES, SERIES, INSTALL EPG, RECORDINGS, CATCHUP and 4 icons above of users, settings, account info and notifications. You can simply click on Live TV and enjoy services.

More Features and Guide:
Series:
Click on SERIES from the dashboard and you’ll get the list of series available there and watch it.

Install EPG:
Clicking on Install EPG available on the dashboard will start loading EPG automatically. Just click on this and nothing to do here anymore.

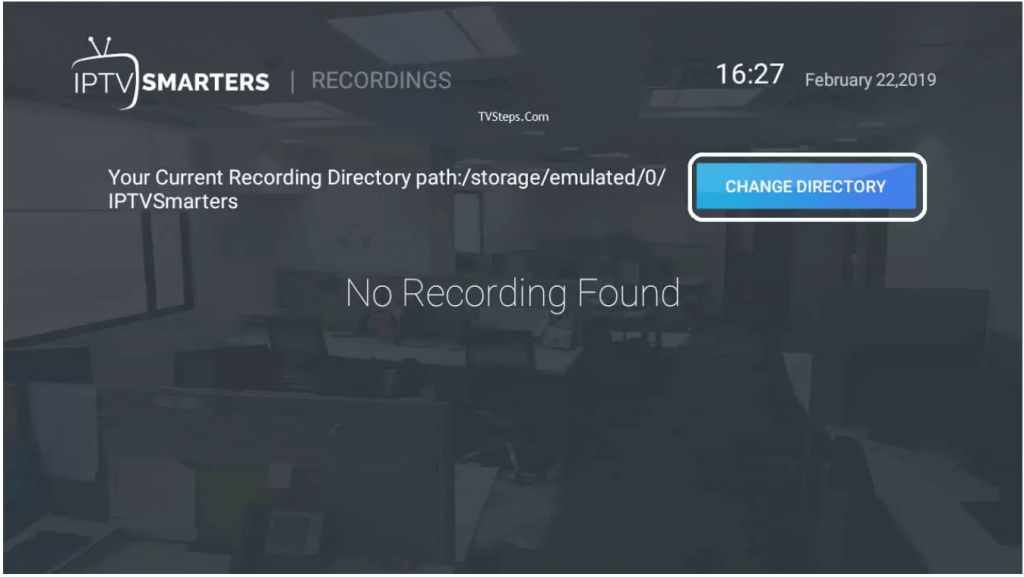
Recordings:
Long pressing on the channel shows us an option of Start Recording, while you’re watching a program you can record it and can watch it later when you want. You need to select the offline folder where you wanna save the recordings.
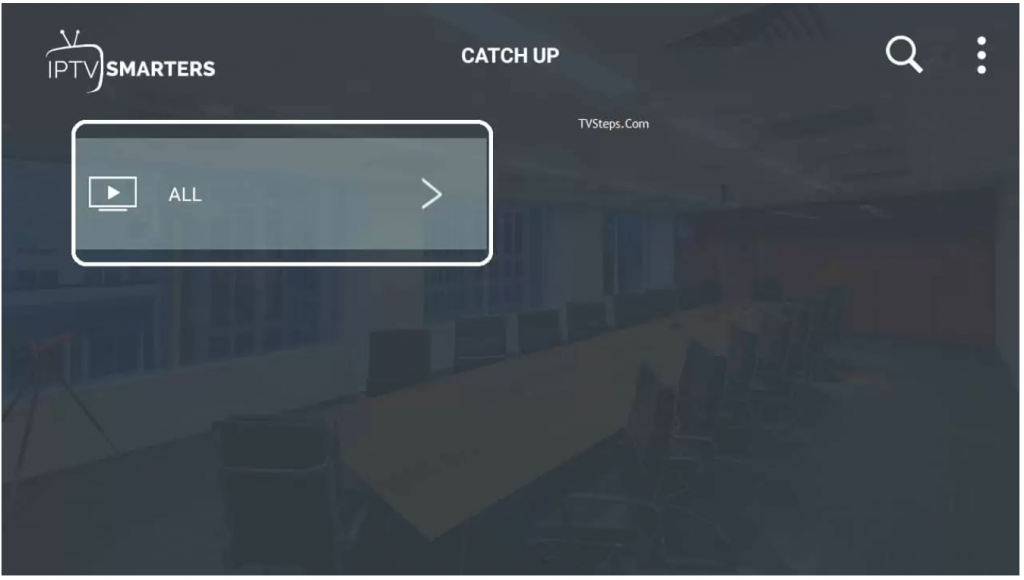
Catchup:
Catchup is another best recording feature provided by your IPTV service provider. This keeps the file stored on the server not offline. The is best than recordings above because you don’t need to worry about the storage here.
Account Info:
The second icon after notification bell on the dashboard, clicking on this show you the information about your subscription including expiry date, trial info, the limit of connections, creation date and more:

Notifications:
When you’re using their app for a long time, when they add a new feature you can see that in notifications like this:

LIVE TV:
Clicking on LIVE TV will show you categories country wise.

Clicking on a category will open the available channels list, will load icons (if available).

You can press tab button and get quick access to few great features including updating EPG and List.

Long press channel name and will see options like recording and favorites.

Settings:
There are many setting options lets cover 1 by one.

General Settings:
There you can setup AutoStart on bootup, Show Full EPG, Active Subtitles, Set user agent and change language. By default settings are correct. If you want to change you can do it here.

EPG Time Shift:
By default, it’s 0 you can change it to any number and save it.

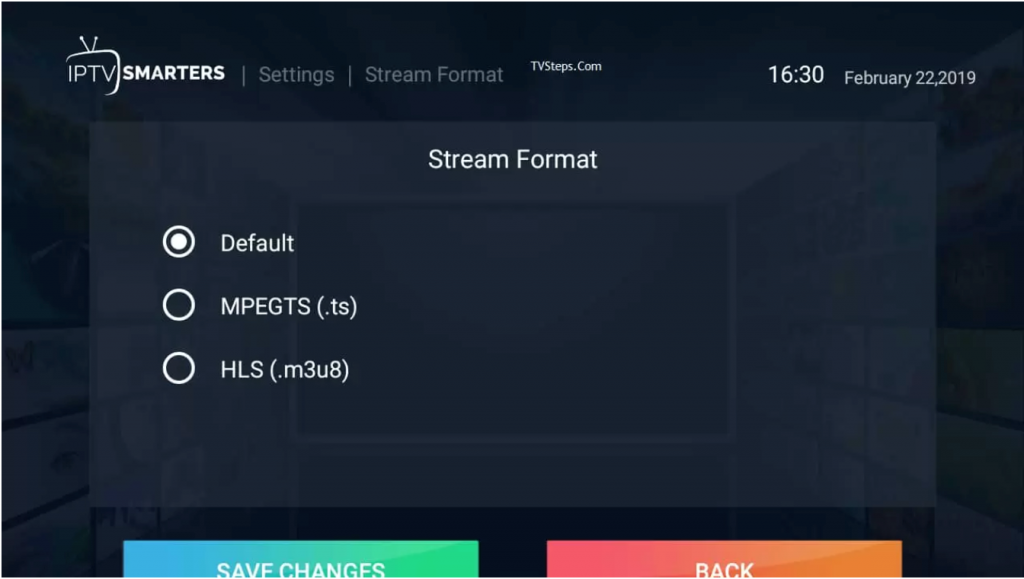
Stream Format:
Its select default, you can save it as MPEGTS (.ts format) or HLS (.m3u8) format. Most commonly used in MPEGTS.
Time Format:
By default its 24 hours, you can change it to 12 hours and save it.

EPG Timeline:
The default selected is Show All channels, but I’ll recommend going to Show Channels only with EPG. So if there is no EPG with any channel it will nothing show up there, otherwise, a default message will keep showing there.

Automation:
Keep both options checked as they are check by default already. If wanna change you can uncheck here.
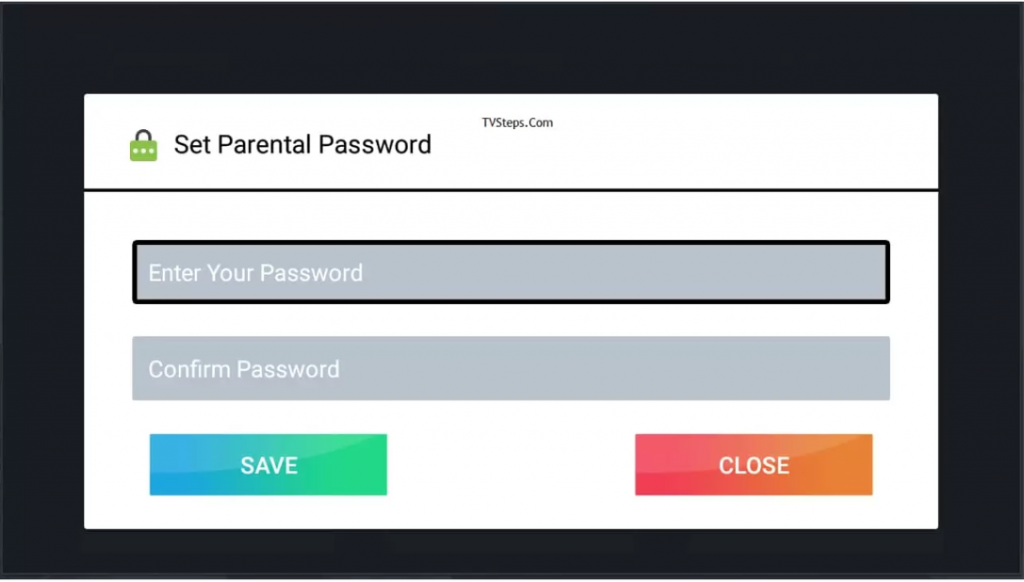
Set Parental Password:
This the security feature, if you’ve kids at home and there adult channels in the list, you can lock them and the password only you know. So, when kids are gonna click on this channel it will ask for a password to stream it.
 Player Selection:
The default setting will be Built-in Player, but you can change it if you’ve already selected a player by clicking on ADD PLAYER button (learn in next steps).
When you’ll click on ADD PLAYER, it will show you available players.
Click on the player you want and it will confirm adding. Click on Add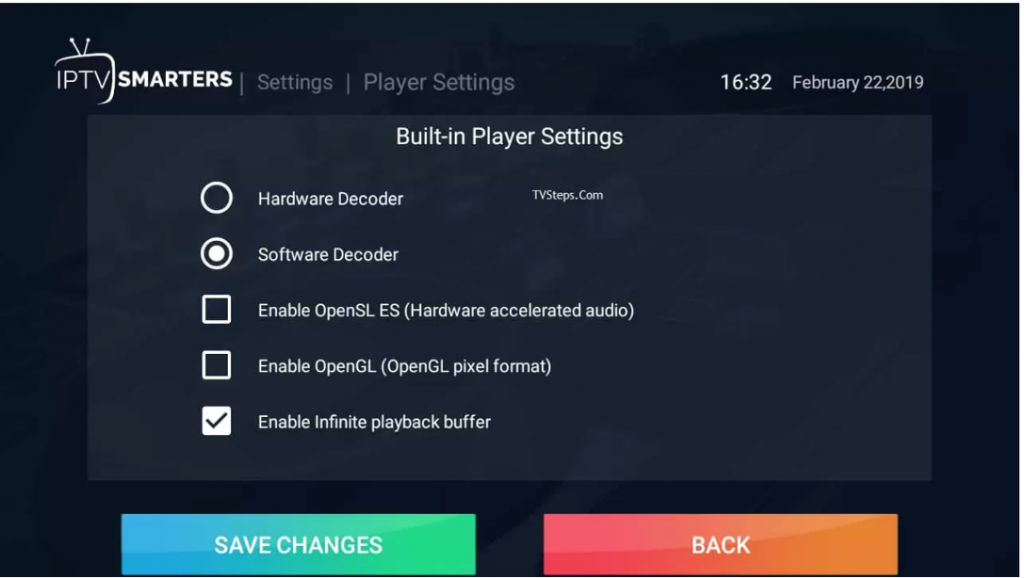
Now back to Player selection, clicking on the built-in player will show you another player you just selected and can save it. Next, when you’ll play selected media it will autoplay in your selected player. 
Player Settings:
There are more settings for your player, I will suggest keeping default settings
External Players:
You will see now all external players if you’ve already added, to remove them click on the player name or long-press on the name and it will show an option remove. Click and remove it if you want to remove.
Checking for Updates:
Click on it and it will update it if an update is available.
Finally IPTV Smarters Pro is ready!
This IPTV Smarters Pro settings can be applied on Android TV Box, Firestick, and other popular supported operating systems. 
Follow the steps below to set up your app on Firestick.
Step 1: Launch your Firestick.

Step 2: From the firestick dashboard, go to the settings.
Step 3: Click on the Firestick or my Fire TV.
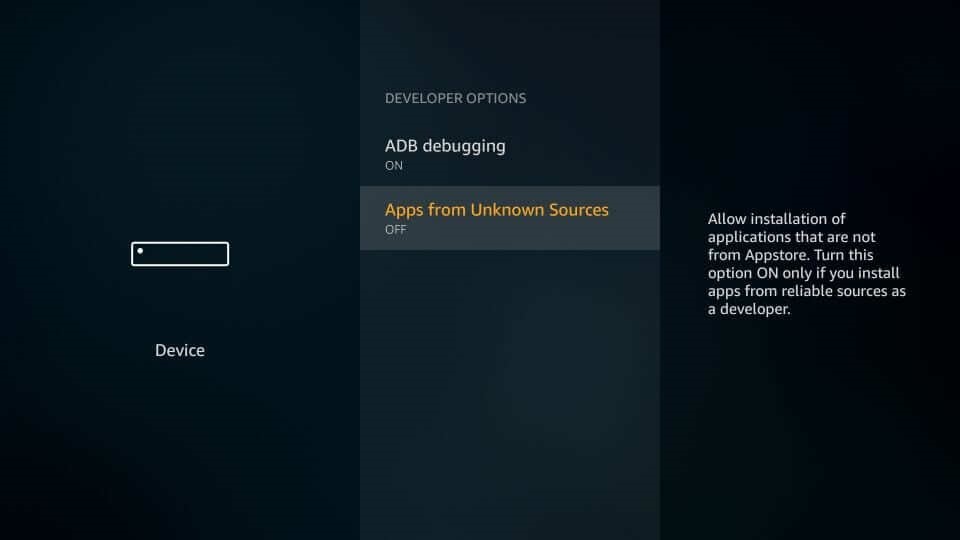
Step 4: Now, go to the developer options.
Step 5: Within the developer options, make sure to enable “apps from unknown sources” option.
Step 6: Now, go back to the firestick dashboard and look for the downloader app.

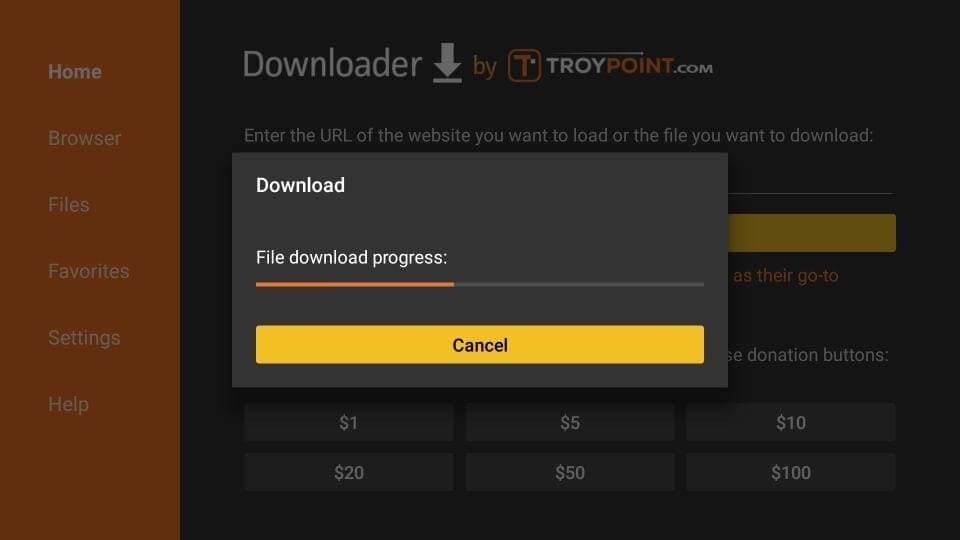
Step 7: Now, open the downloader application. When prompted, allow the access to media, photos and files on your device.

Step 8: Now download the IPTV Smarters Pro app by using the following URL firesticktricks.com/smarter.

Step 9: Once the file is downloaded, click on the install button.

Step 10: Once the app is installed, open the IPTV Smarters Pro app and click on the “add new user”. It will be as shown in the picture below.

Step 11: Now, you need to login into the app. There are two ways to do so. Either by using M3U playlist or by using the username and password that is the Xtream codes API.

The username and password can be found by looking at the URL provided by the service provider. If you do not the necessary details, please contact your provider.
Step 12: Once you are done logging in, you will be redirected to the list users screen as shown below. Click on the profile you just created.

Step 13: Congratulations, you have now successfully set up and configured the IPTV Smarters Pro app on your firestick.
ADDITIONAL FEATURES AVAILABLE FOR IPTV SMARTERS PRO APP
Series
From the IPTV Smarters Pro app dashboard, look for the series option. Within the series option, you will find a list of series that are available to watch.
Record
You can also record any show by using the option “start recording”. The recording option gives you an option to watch the show later. All you need to do is select an offline folder where you want all the recordings to be saved.
Catchup
Catchup is another option for recording your shows. It also records shows but you need not to worry about the storage since all the recordings are saved on the server.
Live TV
Since IPTV Smarters pro app does give the functionality of viewing live shows, you can view any live show of any country regardless of your location
